How To Clean A Printer
Over the years, we are mostly asked questions from readers regarding the best way to clean your printer. So today we decided to share proven tips to help you get a maximum output of your printer.
So are you ready to learn how to clean a printer so this article will make you a pro!
You also want to get rid of paper jams, smudges, and bad prints so simply you can clean a printer and solve all the issues.
If you are a non-techie person then you may think that it is a hard task to do. But this is not true. By following the simple steps you can easily clean your printer like a professional. That said, let’s begin.
Table of Contents
Benefits Of Cleaning A Printer
1. Better Performance
A reliable printer has also proven to be a great way to increase productivity and efficiency of work. And don’t you want to save your time and get rid of smudges, paper jams, etc? Of course yes!
Then cleaning your printer should be your habit. You must do it at least once a week. So your printer will run smoothly.
2. Save Money
Frequent maintenance and cleaning your printer can help you to save money in many ways like when your printer will run long, there is no need to buy a new one. And since you can avoid paper jams and other feeding issues by simply cleaning so you will also save these costs.
3. Longer Lifespan
One of the benefits is the longevity of your printer. Otherwise, debris and dust reduce the life of a machine. So you should always take care of their timely maintenance needs in order to ensure that your printer lasts long.
4. Improves Print Quality
Everyone wants to make high-quality prints as the new printer does. But over time, the print quality becomes low because of not cleaning your printer timely. If you are tired of smudging, smearing, and blurring prints then cleaning your printer is the ultimate solution.
Related Post: How To Improve Print Quality
How To Clean A Printer Step By Step
Cleaning The Exterior
Cleaning the body of your printer seems simple but today we are going to tell you how to do it like a pro. So let’s begin!
Unplug your printer for the safety purpose.
Use the soft cloth moistened with water to remove the dust. Clean the surface of your printer gently. Make sure to not let water get inside your printer.
You can also use alcohol or mild detergent. Also, make sure that you don’t use any household cleaners because they can damage the finish of the exterior case.
Automatic Cleaning
The next step is the automatic cleaning of your printer by using built-in software Check out the printer’s manual and go through the process once because every printer is different to use. So that’s why we recommend using manuals. And don’t worry if you don’t have a manual now you can find that online on the manufacturer’s website.
Access the control panel of your printer from your laptop or computer.
Next, locate the “Clean” option.
Depending on the make of your printer you will find either of the options; “Maintenance”, Properties”, “Toolbox”, or “Utility”. So click the one which you find.
Finally, click and run the cleaning function and you are done.
You can now print a test page to ensure if the process was successful or not. Also, you may notice the improvement in print quality.
How to Clean an Inkjet Printer Manually
Firstly, unplug your printer before your start and then open your printer.
Next, remove the ink cartridges. They will be easily removed so avoid pulling forcefully as it can cause damage. However, if you are unable to remove ink cartridges, you can use the manual.
Take a bowl of warm water, alcohol, and a piece of a soft cloth.
Now it’s time to remove the extra ink or debris. Wipe the cartridges with a wet cloth to get rid of extra ink.
Moving on, you should also clean the cartridges holder before putting them back.
Let the ink cartridges dry. You can also gently rub the unused cotton swab onto the print head, cartridges, and surrounding area. And wait for 10 to 20 minutes.
It’s time for reinstalling the ink cartridges. Put the cartridges back and ensure that they are accurately fit.
Now turn on the printer after plugging in and wait for a few seconds.
You should check whether your printer is working properly or not.
Now, make a test print to ensure your printer is running smoothly.
Cleaning Paper Rollers Of Inkjet Printer
Paper rollers grab the sheets of paper and feed the paper in and out of your printer. Cleaning them can avoid many paper feeding issues like paper jams, etc. So you should also clean your printer rollers to remove dust and ink.
Moving on, locate the paper rollers. You can rotate them easily, however, if you find hindrance in rotating then you can use the “Feed Paper” option on the printer to rotate them automatically.
Now clean the printer rollers of your inkjet printer with water, cotton swab, or a rubber rejuvenating product.
Wait for a few minutes until the rollers dry before you put them back.
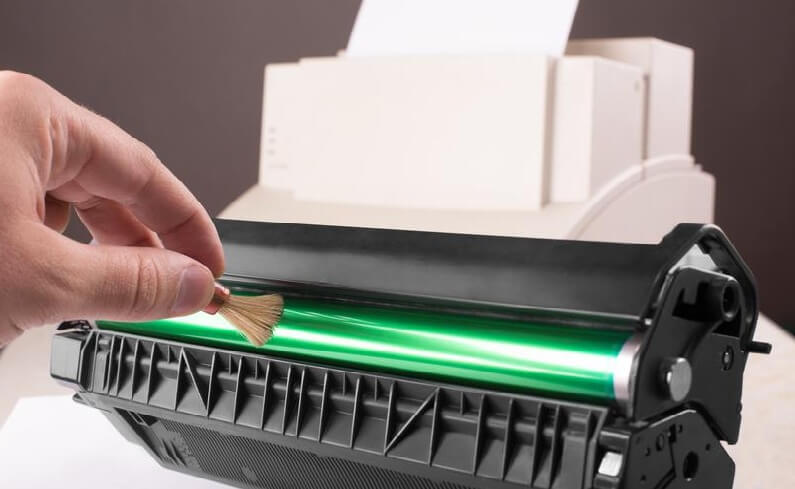
Cleaning Paper Rollers Of Laser Printer
Always unplug your printer before you clean it. Otherwise leaving the machine plugged in while cleaning can be harmful.
For laser printers, you will find the paper rollers on the top of your printer. If in case you are unable to rotate them manually then you can access the control panel of your printer.
Use alcohol, brush, and lint-free cloth to clean the paper rollers completely. And make sure not to touch the transfer roller while cleaning.
Reinstall the cartridges after they get dry.
Conclusion
We covered the complete process step by step to ensure that you will learn it. We hope now it is easy for you to do it yourself. Isn’t this?
And we also mentioned the benefits that a clean and well-maintained printer can deliver. We also recommend you always read the instructions mentioned in the printer’s manual. Now share your thoughts in the comments below!